When I first started contact juggling, I wanted some acrylic balls to use, but didn't want to spend the money to get a profesional set. Through trial and error and misusing various products, I found a way to make them myself. It takes quite some patience, and the balls don't turn out as perfect as the manufactured kind, but once you get the hang of it you can customize them any way you want. Here's how to make you're own.
First, you need acrylic:
I use an acrylic compound that comes in two liquids. There are several brands out there. I've used
Acrylic Water - The stuff I learned with. Easy to mix, because it comes in equal parts, but you have to buy two packs to make a set of 3 balls. It stays somewhat soft, and tacky for weeks before it fully hardens. It also seems to turn yellow the most after time.
Liquid Illusion comes in bigger bottles, is harder, and yellows more slowly than Acrylic Water.
Everlasting Elegance has worked the best for me so far. It hardens the most, and turns yellow the least. The only draw back is that the acrylic and the hardening solution come in a 2:1 ratio. This makes it trickier when you want to make a certain amount.
The next thing you need is to make a mold:
For this, you need clear, plastic globes, a dremel tool, hot glue, plastic from a soda bottle, tape, and plastic wrap.
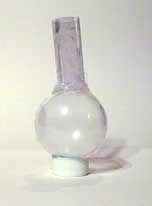
The globes I use are called "Crystal Keepsakes" and they are sold as a craft item for making Christmas Tree ornaments and little Keepsakes. They come in different sizes and shapes. I usually get 3" spherical ones. These instructions are for a set of three balls, so you'll need to buy 3 of these plastic globes.
On each globe, you'll need to make a hole about the size of a dime. Start by snapping the two halves of the globe together and lining the tabs together. Use a marker to draw a dime-sized circle around the two tabs. Separate the two halves of the dome, and use a dremel tool to carefully cut away at plastic inside the circle you've drawn. I find it's easier to do this if you use a dremel sanding disk to cut the tabs off first and slowly away at the edge of the half-globe until it's a clear opening. It doesn't have to be perfect, it just has to be open enough to allow the acrylic to pour in smoothly.
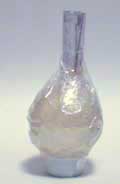
After you've cut the holes, make sure the insides of the globes are clean and snap each of them together so that the holes line up. Now we are going to make plastic chimney for each of the globes. The reason for this is that Acrylic shrinks as it hardens, so you have to have an extra amount of liquid in order to get a complete sphere. I learned this because the first ball I made ended up with a flat bottom. To make these chimneys, cut 3, 2"x1" rectangles out of soda-bottle plastic. Roll each rectangle around your finger so that it makes a tube that will fit the holes on the globes and then wrap the tube with clear tape so that they stay in that shape. Attach a tube to each of the globes by carefully putting a ring of hot glue outside the edge of the hole of the globe. As the glue is cooling, squarely put the edge of the tube into the glue so that the inside of the tube leads right into the hole. It's important that you keep any glue from getting inside the globe. After the glue has hardened, slowly place more hot glue around the outside of the base where the tube meets the globe. Do not place too much hot glue directly on the tube as this will melt and warp the plastic. When you are fairly confident that you've sealed the base of the chimney, start putting hot glue along the edge of the globe where the two halves come together. Even though the snapped together globes seem air tight, acrylic can leak out and ruin the whole project.
Just to be extra careful, I like to wrap each of molds with plastic wrap. Tear out a rectangle of wrap, fold in half, and place the bottom of the mold in the center of the wrap. Twist the wrap around the mold and tape up the edge, leaving the opening of the chimney uncovered.
To keep the molds upright (so that the chimney points straight up), you'll need a base. I use soda a bottle cap, and tape it to the bottom of the mold.
When you've made your mold, and you're fairly confident that it's not going to leak, it's time to mix the acrylic. Whatever compound you're using, read the instructions carefully. Be sure the two liquids are mixed in the right amounts, and be aware that hardening compound usually pours more slowly than the liquid acrylic. You will probably need to use nearly all of the compound, but you want to leave just a small amount of both liquids in the bottles, and save them for later. Stir the mixture very slowly and try to avoid bubbles.
When the compound is properly mixed, you can begin pouring. Tilt the mold so that the chimney is not quite pointing straight up. Pour slowly into the top of the chimney and hold the mold at an angle, so that the compound slides down the chimney into the mold, rather than falling into (this will reduce bubbles). As the mold fills to the top of the globe, move the mold around so the liquid touches all of the inside surface. Be sure to fill the mold past the base of the chimney so that the liquid fills the chimney about an inch. Acrylic shrinks as it hardens and if you don't fill the mold past the globe part, you will not have a complete sphere.
Place the three, filled molds someplace where they will not be disturbed. The hardening process takes about 3 days, on average. Temperature, humidity, and proper acrylic/hardener ratio changes how long this takes. You can check the firmness by poking the liquid at the top of one of the chimneys with a paper clip. You can also check by keeping the container in which you mixed the compound and checking to see when it's no longer sticky to the touch.
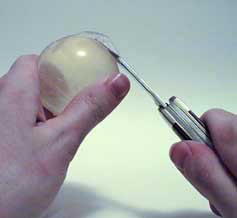
When you're certain the compound has hardened, tear the plastic coating off the mold. With a sharp knife, carve off the hot glue and cut the soda bottle plastic off of the chimney. Because the globes are made out of a porous plastic, the Acrylic sticks to the inside of the mold and is tricky to get out. Set the mold on the floor, hold it in place and gently hit the globe with a hammer. The acrylic itself is very impact resistant, and will not be damaged by being hit. However, you still want to be careful of shattering the plastic globe and puncturing the surface of the acrylic. You want to crack the plastic of the globe, and allow air to get in between the plastic and the acrylic. As air separates the plastic from the acrylic, the plastic will become noticeably less transparent, and easier to peel off. Hopefully, persistent use of the hammer will let you remove most of the mold, but it will likely become necessary to pry much of the mold off. Use a thin, dull, hard object like the handle of a metal spoon to gently pry between the plastic and the acrylic and lift the plastic off. Removing the acrylic from the mold is a difficult process and is best done slowly and carefully, as not to damage the acrylic.
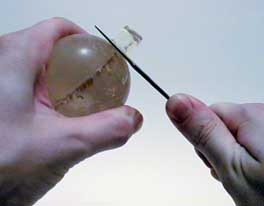
Once the plastic shell has been removed, use a sharp knife and remove the trim created by the seam of the shell. The chimney will leave a stem of acrylic on the sphere. To get as close to a sphere as possible, carve away at the stem, using slow, steady cuts with a sharp knife. Acrylic tends to be rubbery and hard to carve, so be patient.
After you've gotten it as close to a sphere as it's going to get, sand the surface of the ball, focusing on the seam and the spot where the stem was. It's best to start with a rough sand paper and progress to a finer grain.
At this point, the ball will have lost a lot of its transparency because of the porous nature of the plastic shells, and the scratches from the sand paper. Now, is when it's important to have left some of the acrylic liquid and hardener in the bottles. Set each of the balls on upside-down bottle caps (or other suitable bases). On a flat, smooth, disposable surface put few drops of the acrylic liquid. Counting drops, ad the appropriate amount of hardening solution. Mix the liquids together using a toothpick, paper clip or suitable mixing stick. Touch the solution with your index finger and pick up a small amount of liquid. Rub the solution gently onto half the surface of each of the balls. Note that you only wan to put a small amount of liquid, probably less than you think you need. If you put too much liquid on the ball, it will slowly drip off and leave little "tears" on the ball. Wait for the compound to dry (another day or 3), turn the balls over and apply more liquid acrylic to the other halves, using the same technique. Note that you may need to do this several times to get surface as transparent as you'd like.
Frequent Problems:
The Acrylic shrank while it was hardening and now the ball has a flat top. You didn't put enough acrylic in the chimney. If you haven't taken off the mold, then you can just put more acrylic mix into the chimney and it wait for it to harden again. If you've already taken the ball out of the mold, then there's not much you can do.
The mold leaked or is leaking. If the mix hasn't fully hardened yet, place the mold(s> under some plastic or a lot of newspaper. Get some more plastic wrap and tape and cover the mold as tightly as you can. Re-fill the mold with more acrylic. If the acrylic mix has leaked on to carpet or fabric, there's very little that can be done to clean it up. If it has leaked onto a smooth, hard surface it can most likely be scraped or peeled off once hardened.
The acrylic is taking a really long time to harden. Humidity, temperature, quality of the acrylic mix, and the proper mixing of the two components plays a factor in how long it takes to fully harden. You can just wait longer for it to harden, but if it never fully hardens you might have to throw the whole batch away and mix more carefully next time.
The Ball has hard "tears" on it or is stuck to the base. You used too much acrylic. It sticks to the ball when you're applying it, but drips down over time before it hardens. Trim the excess acrylic off, sand the area, and apply smaller amounts of acrylic liquid to the areas.
There are a lot of bubbles under the surface of the ball. This is hard to avoid completely, and impossible to fix. Just try to stir the mix slowly and not let the stream overlap while pouring it.
Customizing Techniques:
Colorizing You can ad a small amount of acrylic paint to the mix after you've blended the mixture together, but before you pour it into the mold. It only takes a couple of drops of paint per sphere. If
you want the balls to retain their transparency, use a translucent acrylic paint. You can create multi-color balls by partialling filling the mold with colored acrylic, then adding different colored acrylics.
Placing objects inside the balls To place a small object inside the ball, fill the mold about half way with acrylic. After, the acrylic has partially hardened, slip the object through the chimney of the tube so that it lands upside down in the acrylic. Fill the mold the rest of the way with acrylic.
For objects that will not fit through the chimney, take a small scrap of hardened acrylic (perhaps the stem from a previous ball) and stick it to the top of the object with wet acrylic. After you've cut the hole in the plastic shell, but before you've glued the shell together, place the object upside down inside the shell. Proceed to construct the mold and pour as usual.
This information was provided by Andy Diehl